
How to create a design
To learn how to create a design, select your application and check the guide.
About Print Media
| Light-shielding tweezers | It is water-proof, translucent, and lightweight. It is also durable and has a luxurious feel. It has a characteristic of being much more resistant to creasing than cotton material. |
|---|---|
| Fabric for electric color | This fabric is affixed to the frame of the main body with built-in LED light. It is characterized by beautiful colors, but the colors are even more vivid when the LED light is turned on. Homare Exhibition's fabric for electric coloring uses one piece of fabric per panel, regardless of size, so there are no joints and the fabric is nice and taut. No ironing is required. LEGO series fabrics are treated for disaster resistance. |
Data Submission
Creating a screenshot
We provide easy-to-understand explanations of how to create design data and what to check when submitting it, divided by application.
Please read this before creating and submitting your design. It also touches on the characteristics of print media.
*Screenshots (captures) will be used as a reference for checking the format when checking the data. However, we will not check the details or proofread the text.
For Windows users
 |
01. open the design layout file Please open the file in the application in which you created the complete data for submission. |
|---|---|
 |
02. set the magnification so that the entire image can be displayed Please set the window to full screen so that the entire image is visible. Please make sure that the layout data is not hidden by the various toolboxes. |
 |
03. create a screenshot The button shown above is located in the upper right corner of the keyboard (depending on the model). Press that button to save the image to Windows memory. At this point, no sound is made. No sound is made at this point and no file is created. |
 |
04. Start "Paint" from Start > Programs > Accessories In Start > Programs > Accessories, you will find an application called "Paint. Launch it (or Photoshop or other image editing software if you have it). |
 |
05. Select "Paste" and paste the screen. Select "Paste" from the application's Edit menu or from the submenu that appears by right-clicking. The screen you just worked on will be pasted. Give it a file name that identifies it as a screenshot, such as "screenshot front" or "screenshot back," and save it as a jpg file. Please make sure that the file name is not confusing. |
For Macintosh users
 |
01. Open the design layout file Please open the file in the application in which you created the complete data for submission. |
|---|---|
 |
02. Set the magnification so that the entire image can be displayed Please set the window to full screen so that the entire image is visible. Please make sure that the layout data is not hidden by the various toolboxes. |
 |
03. create a screenshot Press the shortcut (Command + Shift + 3) as shown in the figure, and you will hear a "basha" sound. If you use *(Command + Shift + 4), the cursor will change to a cross and you can drag around the area you want to capture. |
 |
04.The screenshot will be saved in the startup disk. A file with the icon shown in the figure will be created. ● On MacOS9.x, the file is saved in the first level of the startup disk. (A pict file will be created with a file name: "Screen 1", etc.) ● On MacOS10.4 or earlier, the file is saved on the desktop. (A PDF file such as file name: "Screen 1" will be created.) If you are using MacOS 10.4 or later, the file will be saved to the desktop. (File name: A file name such as "Picture1.png" will be created.) *Please change the file name to a file name that can be identified as a screenshot. If the file name cannot be distinguished, it may not be confirmed as a screenshot. |
Data compression method
| For MacOSX | MacOSX allows compression in the standard zip format. Control-click and select "Compress 12345678_001". Compression will reduce file corruption during web submission. Please also include a screenshot or jpg or pdf exported image in the folder so that we can check the data. The file name of the screenshot should include letters such as "kanpu" so that we can identify it as a screenshot. Please also include a "screenshot (capture)" folder for use in our data checking process. If we cannot identify the file as a screenshot, we may not be able to check the data. |
|---|---|
| For MacOS9 | Drag and drop the folder created in step 1 onto the compression software. Aladdin DropStuff (shareware) is the standard compression software for Mac OS. MacLha" is also widely used. Compression reduces file damage during web submission. Alladdin DropStuff" is preinstalled in Mac OS 9. [Location of Aladdin DropStuff] /Applications(Mac OS 9)/Internet Utilities/Aladdin Dropstuff and Expander/Aladdin DropStuff 5.5J/DropStuff |
| For Windows | Windows XP, Vista, and Windows 7 can compress files in the standard ZIP format. Right-click on the folder you are submitting to → Send → Compressed (ZIP) folder] By compressing files, file damage can be minimized when submitting via the web. Please also include a "screenshot" or jpg or pdf exported image for us to check the data in the folder. The file name of the screenshot should include letters such as "kanpu" so that we can identify it as a screenshot. Please also include a "screenshot (capture)" folder for use in our data checking process. If we cannot identify the file as a screenshot, we may not be able to check the data. |
How to Submit
There are three ways to submit data: via the web, by email, or by media. Please send your data using the method that is most convenient for you.
Please check the following three points before submitting your data.
Have you placed your order?
Before submitting your data, please place your order for the product. You can place your order via the order form on our website or by phone.
Please submit complete data
Complete data is completed, printable production data that does not require any modification.
Please refer to the technical guide before submitting your data.
The deadline for data submission is 3 p.m.
If your data arrives at our company after 3:00 p.m., it will be processed the next day.
*It may take some time to send the data. Please submit your data well in advance.
If you are in a hurry, we will give you priority data checking for an additional 700 yen.
Please select the option when ordering.
3 submission methods
1. Online submission
You can easily send files up to 3GB in size from this web page.
The WEB submission button will appear after logging in with your member account.
1. 1. log in to My Page and click the "Submit online" button to submit online.

2. Upload your file for web submission

*Please note that if you are not logged in, the following message will appear and you will not be able to submit your file.

3. Click the "Buy Now" button after the file upload is complete.

4. click the "Order Complete" button.
*Payment is not required for online submission. You will not be charged even if you proceed to order completion.

2. Email submission
This is a method to send data by attaching it to an email. Depending on the transmission capacity limit of your contracted provider, you may not be able to send the data.
3. Submissions by mail on media
We also accept submissions by mail on media (CD-R, DVD, MO, etc.).
Media submission destination
Homare Holdings Co., Ltd.
E-mail:info@homareprinting.jp
About printing on fabric media
The cloth media (cloth) we handle is a transparent, waterproof material. It has a slight stretch, so it can be attached neatly and neatly. (*Please note that since we have many partner factories, there may be slight differences in the texture of the fabric depending on the factory.)
Due to the characteristics of the material, fabric media (cloth) does not produce colors in the same way as prints on paper, so some printed colors may be difficult to reproduce.
The way colors look varies from person to person, and just as there are differences between PC monitors, there are also differences depending on the output material and printing machine. Even if the same data is printed, the color will be different depending on the media material and printing machine.
The data you submit will be printed using the process color (CMYK) information of the data as is, but please note that the colors will be those of our printing press. If you provide color information using color charts such as DIC or PANTONE when submitting the data, we will print as close to the specified colors as possible.
In addition, since it may be particularly difficult to reproduce the colors of the following items, we recommend that you perform color calibration to ensure color matching.
- Blue colors
- High and low color intensity
- Items with gradation or shading
Color Proofing Options
A color proof is a trial print to check the color and photo output before the actual printing.
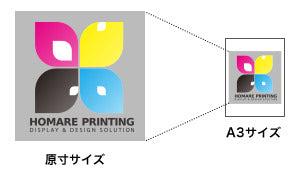
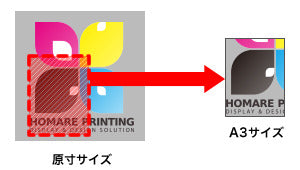
Our color proofs are prepared on two A3 sheets as shown below. (※)
A3 size / 2 sheets 10,000 yen (excluding tax)
* Shipping costs are not included.
Overall reduction
The entire image of the data to be printed is reduced to one A3 size page and output.
Actual size of part
A portion of the data to be actually printed is extracted and output at full size on one A3 sheet.
*Please note that the color proofing of large size products may differ from the above specifications.
(The two types available, full-scale reduction and partial actual size, will remain the same, but other specifications such as size may change.)
* A color proofing fee [A3 size/2 sheets: 10,000 yen (excluding tax)] will be charged each time you print an additional color proof after it has already been printed or re-print it after correcting the data.


